

How To Tell Whic Version Of Camera Raw Is Installed
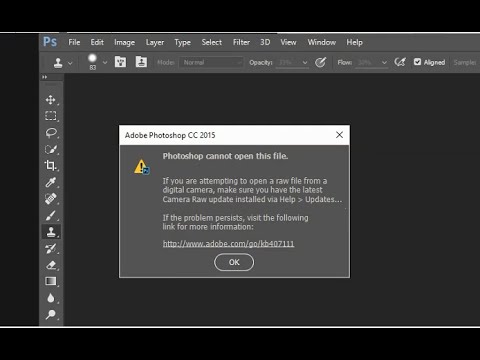
How to prepare Span and Photoshop don't recognize raw files. Photoshop can not open up raw file . Photoshop Elements 11 Camera Raw images enable yous to post-process your pictures. When yous take a flick with a digital camera in Camera Raw format, the camera'southward sensor records every bit much information equally it tin can. When you open up a Camera Raw file in Elements, you make up one's mind what part of that information is opened equally a new image.
If y'all don't have a camera capable of capturing Photographic camera Raw images, you aren't left out. Any photo you lot've saved in JPEG or TIFF format can also open in the Camera Raw converter.
You don't have the same file attributes as you do with Photographic camera Raw images — these images won't accept all the data captured by your photographic camera's sensor because the images volition already be mail processed — just you practice have admission to all the image correction controls that authentic Camera Raw files have.
In regard to processing Camera Raw files, suppose your camera is set for exposure in tungsten lighting. (Tungsten flash photography is common in studios.) If you lot take this camera outside in daylight and shoot an prototype without changing the settings, all your images appear with a blueish bandage because tungsten lighting requires a cooler colour temperature than daylight.
If you acquire images that are saved in JPEG format, you have to exercise a lot of colour correction after the image opens in Elements.
If you shoot the prototype in Camera Raw format, you just process the image with a warmer temperature (consistent with weather condition when the shot was taken), and your color correction in Elements happens in a fraction of the time it takes to fix a file opened without using the Camera Raw converter. Fortunately, y'all can also change temperature for JPEG and TIFF files if you open them in the Camera Raw converter.
Postal service-processing Camera Raw images requires a plug-in that's installed with Photoshop Elements. When you open a Camera Raw image, the Camera Raw plug-in takes over and provides y'all with a huge set of options for post-processing the image earlier you open up it in ane of the Elements Editors.
Solutions ane
Which version of Photoshop and Camera Raw exercise you have installed?
Which photographic camera brand and model are your Raw files from?
When you uninstalled and reinstalled, y'all probably rolled back your version of Camera Raw to a version which does not support your camera model. Endeavour updating Camera Raw.
Solutions 2
Solutions
Solution 1: Install the latest version of the Camera Raw plug-in that is compatible with your Adobe application.
Install the latest version of the Camera Raw plug-in that your version of Photoshop or Photoshop Elements is compatible with. (Come across Camera Raw-compatible Adobe applications, if necessary.) For example, if your version of Photoshop is uniform with Camera Raw versions through 4.6, and so install version 4.6. Install the latest version even if you only need version 4.iii to enable support for your camera.
Note: More often than not, each new version of the Camera Raw plug-in builds on the cameras that the previous version supports. For example, Camera Raw version 4.4 supports all of the cameras that version 4.3 supports, plus additional cameras. Version 4.iii supports all of the cameras that version 4.2 supports, plus additional cameras, and then on.
Installation instructions are included on Camera Raw download pages, which you lot can find at http://world wide web.adobe.com/downloads/updates/.
With current-release products, you lot tin update to the latest version of Camera Raw automatically through Adobe Updater or the Adobe Application Manager (CS5 and later). In Photoshop or Photoshop Elements, choose Aid > Updates.
If you still cannot open up photos from your camera, then proceed to Solution 2.
Solution ii: Remove and reinstall Photoshop or Photoshop Elements.
If Photoshop or Photoshop Elements is loading multiple instances of the Photographic camera Raw plug-in, and so these plug-ins conflict with each other. To resolve this problem, remove then reinstall Photoshop or Photoshop Elements.
Of import: Before yous uninstall the software, make sure that you lot have the installation media to reinstall it. Replacement media isn't available for previous versions of Adobe software.
To remove Photoshop or Photoshop Elements on Mac Os:
-
Quit all Adobe applications.
-
Back up whatsoever personal files, including third-party plug-ins, you lot desire to salve in the Applications/Adobe Photoshop[version] binder or the Applications/Adobe Photoshop Elements[version] binder.
-
Practise one of the post-obit:
- If you have Photoshop CS3 or later or Photoshop Elements 6, double-click the uninstaller for your application or for your edition of Adobe Creative Suite in /Applications/Utilities/Adobe Installers. And then, follow the onscreen instructions to remove Photoshop or Photoshop Elements.
- If you have an earlier version of Photoshop or Photoshop Elements, elevate the Adobe Photoshop[version] folder or the Adobe Photoshop Elements[version] folder to the Trash. (These folders are in the Applications folder.)
-
In the Finder, navigate to /Library/Application Back up/Adobe.
Annotation: This file path points to the Library folder at the root level of the startup disk volume. It does not signal to the Library folder within the user Habitation folder.
-
If you come across a folder named Plug-Ins in the Adobe binder, drag it to the Trash.
-
Choose Finder > Empty Trash. If the Trash does not empty completely considering it contains locked files, press the Option key and choose Finder > Empty Trash.
Remove Photoshop or Photoshop Elements on Windows:
-
Close all Adobe applications.
-
Back upward any personal files, including third-political party plug-ins, you lot want to salve from the Program Files/Adobe Photoshop[version] folder or the Programme Files/Photoshop Elements[version] folder.
-
Choose Start > Control Panel (or Start > Settings > Control Panel), and then practise one of the post-obit:
- Windows XP: Open Add together Or Remove Programs.
- Windows Vista, Windows 7: Select Uninstall A Program from the Programs section of the Control Panel Home. Or, if you are in Archetype view, open up Programs And Features.
-
Select your version of Photoshop or Photoshop Elements from the list of installed programs, and so click Modify/Remove (Windows XP) or Uninstall (Windows Vista, Windows vii).
Note: If you accept Photoshop installed as part of a suite, select your edition of Adobe Creative Suite from the list of installed programs.
-
Follow the onscreen instructions to remove Photoshop or Photoshop Elements.
-
In Windows Explorer, navigate to Program Files\Mutual Files\Adobe.
-
If you come across a folder named Plug-Ins in the Adobe folder, delete it.
After you lot have removed Photoshop or Photoshop Elements, reinstall the application using your original installation media. And then, effort to open your raw image. If you cannot open a raw image, then repeat the Instructions to a higher place.
Solution iii: Upgrade to the latest version of Photoshop or Photoshop Elements.
If your version of Photoshop or Photoshop Elements is not compatible with the Camera Raw plug-in version that you need, then consider upgrading to the latest version. The latest version of these applications ever supports the latest version of the Camera Raw plug-in and the widest choice of cameras available.
If you do non want to upgrade, then see Solution 4 for instructions on using the Adobe DNG Converter with your version of Photoshop or Photoshop Elements.
You can purchase an upgrade from an Adobe-authorized reseller or from Adobe directly. For more information, run across How to buy Adobe products.
Solution 4: Use Adobe DNG Converter to catechumen your camera'southward raw files into DNG files.
If your version of Photoshop or Photoshop Elements is not compatible with the version of the Camera Raw plug-in required for your photographic camera, then use the Adobe DNG Converter. Adobe DNG Converter is a free utility that converts photographic camera raw files into Digital Negative (DNG) files without whatever loss of paradigm information. Adobe developed DNG every bit a universal format for raw paradigm files from digital cameras.
Adobe DNG Converter can catechumen the raw image files from the same cameras that the Camera Raw plug-in of the same version supports. To open up the converted DNG files in Camera Raw in Photoshop or Photoshop Elements, you demand Camera Raw 2.3 or later.
- Download Adobe DNG Converter 8.1 for Mac Bone
- Download Adobe DNG Converter viii.one for Windows
To install Adobe DNG Converter on Mac OS, double-click the DMG file you downloaded. Then double-click the Adobe DNG converter.pkg file and follow the onscreen instructions to consummate the installation.
To install Adobe DNG Converter on Windows, double-click the DNGConverter_[version].exe file you downloaded and then follow the onscreen instructions to consummate the installation.
Convert camera raw images to DNG:
-
Create a folder on your hard drive and so move or copy the camera raw files yous want to convert into this binder. If you desire to convert all camera raw files in an existing binder, you lot practice not need to create a folder first.
-
Do i of the post-obit:
- On Mac OS, open the Adobe DNG Converter from the Applications folder.
- In a 32-flake edition of Windows, open the Adobe DNG Converter application from the C:\Plan Files\Adobe\ binder.
- In a 64-bit edition of Windows, open the Adobe DNG Converter application from the C:\Program Files\Adobe\ binder. If you desire to utilize the Adobe DNG Converter from the 32-bit version of Windows, open the Adobe DNG Converter application from the C:\Program Files (x86)\Adobe\ folder.
-
Select the folder of images you want to convert.
-
(Optional) To convert files independent in subfolders of the folder yous selected in the previous pace, check Include Images Independent Within Subfolders.
-
Select Save In New Location so select a binder location to relieve the converted images. Or, select Relieve In Aforementioned Location.
-
(Optional) If you lot selected Include Images Independent Within Subfolders in Step four, then select Preserve Subfolders if y'all want the converted files to be in folders with the original binder structure.
-
(Optional) Select a naming scheme for the converted images. If you practise not alter the naming scheme, the converted files have the aforementioned name every bit the original files, but have the filename extension of DNG.
-
(Optional) To alter conversion settings, select Modify Preferences, choose any options y'all would like from the Preferences dialog, and so click OK.
-
Click Catechumen. A Conversion Condition window indicates the progress of the conversion. When the conversion completes, click OK to render to the Adobe DNG Converter to process more images, or click Exit to close the application.
Solution 5: Bank check for Camera Raw updates that support your camera.
If your camera is not listed in Photographic camera Raw plug-in | Supported cameras, then the Photographic camera Raw plug-in doesn't support your camera. Cheque the page (or the Digital camera raw support page) periodically. You tin can detect out if a new version of the Camera Raw plug-in has been released and whether it supports your photographic camera.

Source: https://theartcult.net/how-to-fix-bridge-and-photoshop-dont-recognize-raw-files-24202.html/
Posted by: everettthereatend.blogspot.com
0 Response to "How To Tell Whic Version Of Camera Raw Is Installed"
Post a Comment